Genius Weft hair extensions are a popular choice for those looking to add volume, length, or color to their natural hair. Known for their durability and seamless application, they provide a natural and long-lasting look without the need for complex installation processes. In this guide, we will walk you through the step-by-step process of installing Genius Weft hair extensions, providing you with detailed instructions, tips, and troubleshooting advice to help you achieve a flawless result.

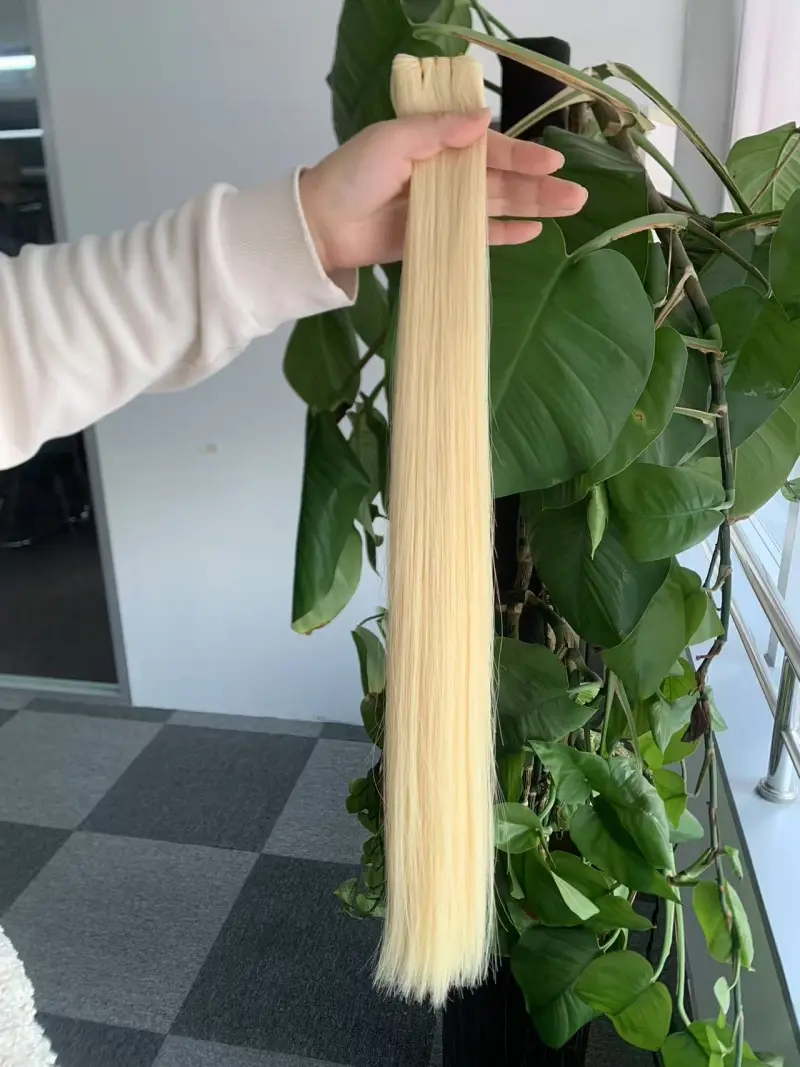
In the picture, the blonde color Genius Weft extensions shine with a natural, radiant glow that complements various skin tones, offering a bright and vibrant look. The lightweight weft design ensures seamless blending with natural hair, providing volume and length while maintaining a flawless, undetectable appearance.
Genius Weft hair extensions are a type of weft hair extension that is attached to your natural hair using various methods such as sewing, tape, or beads. They come in a variety of materials, including human hair and synthetic fibers, offering a broad range of options depending on your budget and style preferences.
Unlike traditional clip-ins or tape-ins, weft extensions are applied to larger sections of hair, making them ideal for adding volume or length. They can be worn for several weeks at a time before needing adjustment or removal.
Before you begin the installation of your Genius Weft hair extensions, it’s important to gather all the necessary tools and materials. Here’s what you’ll need:
| Step | Details | Tools Needed | Estimated Time |
|---|---|---|---|
| Wash and Dry Hair | Thoroughly clean your hair to remove oils and styling products. Dry completely before starting the process. | Clarifying shampoo, conditioner, towel, hairdryer | 15–20 minutes |
| Section Hair | Divide hair into 3–4 layers to ensure the weft is applied evenly and securely. Use clips to hold the sections in place. | Rat tail comb, sectioning clips | 5–10 minutes |
| Measure and Cut Weft | Measure the weft against your natural hair to determine the correct length. Trim if necessary. | Scissors | 5 minutes |
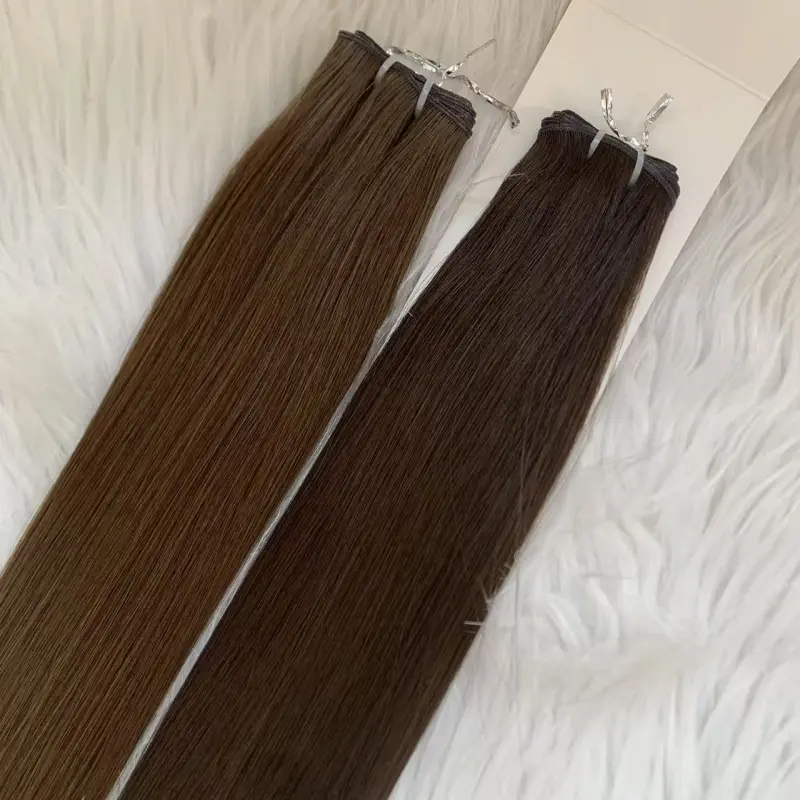
Showing in picture is dark brown Genius Weft hair extensions, it’s important to highlight both the visual appeal and the versatility of the product.
The hair is really good and smooth.
The installation method can vary based on whether you’re using a sew-in, microbead, or tape-in technique. Below, we will discuss the most common methods:
| Step | Details | Tools Needed | Estimated Time |
|---|---|---|---|
| Start at Nape of Neck | Begin with the lowest section of hair, leaving a small section to cover the weft. | None | 2–3 minutes |
| Position Weft | Place the weft horizontally along the section of natural hair. Make sure it’s close to the scalp. | None | 1 minute |
| Sew the Weft | Use a needle and matching thread to sew the weft into the natural hair. Use a back-and-forth stitch technique for a secure attachment. | Needle, thread | 10–15 minutes |
| Secure the Thread | Tie a knot at the end of the thread to secure the weft. Trim any excess thread. | Scissors, needle, thread | 2 minutes |
| Repeat for Other Layers | Move upwards to the next section of hair, continuing the same process. | None | 15–20 minutes |
| Blend and Style | After all wefts are installed, blend the natural hair with the extensions and style as desired. | Comb, styling tools (curling iron/flat iron) | 10–15 minutes |
| Step | Details | Tools Needed | Estimated Time |
|---|---|---|---|
| Section Hair | Divide hair into small, manageable sections, leaving a small top layer to cover the beads. | Rat tail comb, sectioning clips | 5–10 minutes |
| Thread Hair Through Beads | Use a bead threader to thread a small section of natural hair through a micro bead. | Bead threader, micro beads | 1–2 minutes per bead |
| Attach Weft Using Micro Beads | Slide the Genius Weft into the micro bead, then clamp the bead with pliers to secure the weft to your natural hair. | Micro beads, pliers | 3–5 minutes per bead |
| Repeat for Each Section | Continue the process, applying beads and wefts in even sections throughout the hair. | None | 15–30 minutes |
| Blend and Style | Once all beads are secured, blend your natural hair with the extensions for a seamless look. | Comb, styling tools (curling iron/flat iron) | 10–15 minutes |
| Step | Details | Tools Needed | Estimated Time |
|---|---|---|---|
| Section Hair | Start by creating small sections of hair, leaving out a thin layer at the top to cover the extensions. | Rat tail comb, sectioning clips | 5 minutes |
| Apply Tape-In Weft | Remove the backing from the tape-in weft and place it under the section of natural hair. | Tape-in wefts | 1–2 minutes per section |
| Sandwich Hair Between Two Wefts | Place another tape-in weft on top, pressing firmly to secure the natural hair between both tapes. | Tape-in wefts | 2–3 minutes per section |
| Press and Secure | Press both tape-in wefts together to make sure they stick. Ensure the weft sits flat against the scalp. | None | 1 minute per section |
| Repeat for Additional Layers | Continue the process for each section of hair until all wefts are applied. | None | 10–20 minutes |
| Blend and Style | After all wefts are applied, style the hair to blend seamlessly with the natural hair. | Comb, styling tools (curling iron/flat iron) | 10–15 minutes |
Proper maintenance is essential for the longevity and appearance of your Genius Weft hair extensions. Follow these tips to ensure your extensions stay in great condition:
| Step | Details | Estimated Frequency |
|---|---|---|
| Avoid Oil-Based Products | Refrain from using oil-based products near the roots, as these can loosen the weft or tape. | As needed |
| Brush Gently | Use a wide-tooth comb or a special detangling brush to avoid pulling or damaging the extensions. | Daily |
| Regular Re-tightening (Sew-In and Microbeads) | Sew-in and microbead extensions should be tightened every 6–8 weeks to accommodate hair growth. | Every 6–8 weeks |
| Wash with Care | Wash your hair gently, avoiding harsh scrubbing at the root area where the extensions are attached. Use a sulfate-free shampoo. | 1–2 times a week |
| Re-style Extensions | Use heat styling tools (curling iron, flat iron) on a low heat setting to avoid damaging the extensions. | As needed |
Installing Genius Weft hair extensions can be a great way to enhance your hairstyle with added length, volume, or color. Whether you choose the sew-in, microbead, or tape-in method, following the proper steps and using the right tools will help you achieve a flawless, natural look. With proper care, these extensions can last for several weeks, giving you beautiful, voluminous hair with minimal maintenance.
Emeda Hair is a professional manufacturer based in China, renowned for its high-quality Genius Weft hair extensions. The company combines advanced technology, skilled craftsmanship, and premium materials to produce extensions that cater to a wide range of clients, from individual consumers to large-scale beauty salons. This section will dive deeper into Emeda Hair’s Genius Weft hair extensions, exploring their unique features, benefits, and the process behind their creation.
Genius Weft hair extensions are a type of hair extension that uses a machine weft to attach the hair to a natural strand, ensuring durability and a seamless blend. Unlike traditional weft extensions, which can feel bulky or visible, Genius Weft extensions are designed to be lightweight, comfortable, and natural-looking. They can be applied using different methods, including sewing, microbeading, and tape-ins, making them versatile for various customer preferences and hair types.
Emeda Hair takes pride in its advanced manufacturing process, ensuring each Genius Weft extension meets the highest standards of quality and reliability. Here’s an overview of how Emeda Hair creates its premium extensions:
Emeda Hair uses only the finest human hair for its Genius Weft extensions. The hair is sourced ethically and undergoes a rigorous selection process. Each bundle is checked for quality to ensure there are no tangles, split ends, or other imperfections. The hair is then sorted by color, texture, and length to ensure uniformity and consistency.
Once the hair has been sourced, the next step is creating the weft. Emeda Hair uses advanced machine-wefting techniques to attach the hair to a strong, durable weft. The process is highly precise, ensuring that the weft is even and free from any knots or tangles. This machine-wefting process also ensures the extension’s durability and makes it easier for salons and consumers to install.
After the weft is created, the hair is dyed and processed according to the client’s specifications. Emeda Hair offers a wide range of colors, including natural shades like black, brown, and blonde, as well as more vibrant hues like red, purple, and ombre variations. The hair is treated with a gentle, safe coloring process that maintains its softness, shine, and overall quality.
Emeda Hair places a high emphasis on quality control throughout the manufacturing process. After the hair is wefted, each extension undergoes several rounds of testing to ensure that it meets the company’s high standards. The extensions are inspected for any signs of damage, such as shedding, tangling, or inconsistencies in the texture and color.
Once the Genius Weft hair extensions pass quality control, they are carefully packaged to prevent any damage during transport. Emeda Hair ships its products worldwide, ensuring timely delivery for both individual customers and bulk orders for salons and businesses. The extensions are delivered with full instructions on how to install and care for the hair.
Emeda Hair is a trusted name in the hair extension industry, and their Genius Weft hair extensions offer several key advantages that make them a top choice for consumers worldwide:
Emeda Hair’s Genius Weft hair extensions provide a high-quality, versatile, and durable solution for those looking to enhance their hairstyle. Whether you choose the sew-in, microbead, or tape-in method, Emeda Hair ensures that their extensions are comfortable, natural-looking, and easy to maintain. With a commitment to quality and customer satisfaction, Emeda Hair is a top choice for both consumers and salons seeking the best in hair extension products.
For more information about our products or to place an order, please contact us:
Emeda Hair Factory
Phone: 8613165075633
Email: sales19@emedahair.com
We welcome you to experience the difference with Emeda Hair, your trusted partner in hair replacement solutions. Whether you are looking for a natural-looking topper wig or need assistance finding the perfect hair extension, Emeda Hair is here to help.