Genius weft extensions are ultra-lightweight and flexible, lying flat against the head for a natural, undetectable look. The hand-sewn design reduces tension on natural hair, ensuring all-day comfort while seamlessly blending to add volume and length.
The bead and sew method, also known as the hand-tied technique, is the gold standard in professional weft installation. Unlike adhesive-based methods that can damage hair over time, this approach uses silicone-lined micro beads to create a secure foundation. The silicone lining serves a crucial purpose—it grips the hair firmly without slipping while protecting the hair shaft from metal-on-hair friction. This method has gained widespread popularity because it eliminates the need for heat, glue, or tape, all of which can compromise hair health with repeated use.
Silicone-lined micro beads are the unsung heroes of modern extension application. These small, circular beads come in various sizes to accommodate different hair thicknesses and are typically made from medical-grade materials. The interior silicone coating provides cushioning and traction, allowing the bead to grip the hair securely without cutting into it or causing breakage. When crimped properly with professional pliers, these beads create a stable anchor point that distributes the weight of the extensions evenly across the scalp, preventing tension headaches and traction alopecia.
Traditional extension methods often rely on heat-sealed bonds or adhesive glues that contain harsh chemicals. These substances can weaken the hair cuticle, leading to dryness, split ends, and eventually, hair loss. The bead and sew method bypasses these risks entirely by using mechanical attachment. This means clients can wear extensions repeatedly without experiencing the cumulative damage associated with chemical or thermal bonding. For women with fine or fragile hair, this gentle approach is particularly beneficial, as it preserves their natural hair’s integrity while allowing them to enjoy the benefits of extensions.
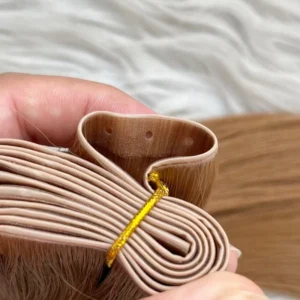
The installation process begins with the stylist creating horizontal partings across the scalp. Starting at the nape and working upward, each section of natural hair is carefully isolated. Small subsets of hair are then pulled through the micro beads, which are positioned just slightly away from the scalp to allow for comfort and natural movement. Once all beads in a row are in place, they are crimped to create a continuous “track” that will serve as the attachment point for the weft. This track must be perfectly straight and level to ensure the finished result lies flat and natural-looking.
With the beaded track established, the stylist begins the hand-sewing process. Using a curved needle—designed specifically for extension work—and thread that matches the client’s hair color, the weft is carefully stitched onto the track. The needle passes through the top edge of the weft and loops around the thread between each bead, creating a series of secure knots. This hand-tied approach allows the weft to float slightly, moving with the head rather than remaining rigid. The result is a natural swing and bounce that mimics the behavior of real hair.
About the art of hand tying, here is an another style, learn more to clink: EMEDA Chinese One Donor Hair Invisible Hand-tied Extension for Salon
Before moving to the next row, the experienced stylist performs several quality checks. They run their fingers along the sewn weft to ensure it’s lying flat and smooth against the head. They ask the client about comfort level, checking that no beads are pressing uncomfortably against the scalp. They also test the tension by gently lifting the weft—it should have slight give but feel securely anchored. Only after these checks are complete does the stylist proceed to the next section, ensuring each row meets the highest standards of craftsmanship.
The foundation of any successful extension application is properly prepared natural hair. Before the client arrives, they are typically instructed to wash their hair without applying conditioner or styling products. This is because product residue, especially silicone and oils found in conditioners, can prevent the micro beads from gripping effectively. When hair is too slippery, beads may shift or loosen over time, compromising the installation’s longevity. Upon arrival, the stylist may also do a quick dry-check to ensure the hair is completely free of buildup, using a gentle clarifying spray if necessary.
Sectioning is both a science and an art in extension installation. Using a fine-toothed tail comb, the stylist creates perfectly straight horizontal partings across the back of the head. These partings must be parallel to each other and consistent in width—typically about one inch apart. The precision of these sections determines how evenly the extensions will be distributed and how natural the final result will appear. Each section is carefully clipped away using sectioning clips, which hold the hair securely without creating kinks or creases that could interfere with the beading process.
Once a section is exposed, the stylist must determine how much natural hair to include in each bead. This decision requires careful judgment: too much hair in a bead creates bulkiness that can be visible and uncomfortable; too little hair risks the bead slipping out over time. Generally, stylists aim for a small, square subsection of hair—approximately the width of the bead itself. Using the tail of the comb, they carefully part out these small sections, ensuring each is cleanly separated from its neighbors before threading the bead.
With a small subsection isolated, the stylist takes a pre-selected micro bead and threads a small loop of hair through it. The bead is then slid up the hair shaft until it rests approximately a quarter-inch from the scalp. This slight distance is crucial—if beads are placed too close to the scalp, they can cause discomfort and tension; if placed too far down, they may not provide adequate support for the weft. The stylist works methodically across the entire row, placing beads approximately one inch apart, creating a series of anchor points that will form the foundation track.
Crimping the beads requires both skill and experience. Using professional-grade extension pliers, the stylist applies firm, even pressure to flatten the bead slightly, securing it around the hair. The goal is to create a grip that is strong enough to hold the weight of the weft but gentle enough to avoid damaging the hair inside. A properly crimped bead should not slide when tugged gently, but the hair within should still move freely. Stylists often describe the perfect crimp as feeling like a firm handshake—secure but not crushing. The silicone lining helps achieve this balance by providing grip without requiring excessive pressure.
About the genius hair extensions, you might want to learn more about : Hand Tied Weft vs Genius Weft
Before proceeding to sew the weft, the stylist performs a comprehensive check of the completed track. They run a finger along the row of beads, ensuring they are evenly spaced and all facing the same direction. They gently tug on individual beads to confirm they are securely crimped. They also ask the client to move their head slightly, checking for any pinching or pulling sensations. If any bead feels questionable, it is removed and replaced immediately. This meticulous attention to detail at the foundation stage prevents problems later and ensures the finished installation will be comfortable, secure, and long-lasting.
The tools used in hand-tied extension work are specially designed for the task. Curved needles, often called “half-round” or “u-shaped” needles, allow stylists to work efficiently in the confined space close to the scalp. The curve follows the natural contour of the head, making it easier to pass the needle under the beaded track without poking the client. Thread selection is equally important—professional extension thread is strong enough to hold the weight of the hair yet fine enough to remain invisible. Available in a range of colors, the thread is carefully matched to the client’s hair color so that even if a tiny portion becomes visible, it blends seamlessly.
Every successful weft attachment begins with a secure starting knot. The stylist threads the needle and ties a small knot at the end of the thread, then positions the weft just below the first bead in the track. Using the curved needle, they pass under the thread that connects the first bead to the scalp—not under the bead itself, which could cause discomfort. The needle is then brought up through the top edge of the weft, and the thread is pulled tight. This process is repeated to create a double knot, ensuring the weft cannot slip loose even under tension. This initial anchor is the foundation upon which the entire row’s security depends.
With the weft anchored, the stylist begins the systematic stitching process. The needle passes under the thread between the first and second beads, then up through the weft, then back under the thread again. This creates a loop that wraps around the beaded track, securing the weft firmly in place. The stitches are pulled tight but not so tight that they pucker the weft or create tension points. Stylists typically space their stitches approximately every quarter-inch, which means each bead in the track receives multiple attachment points, distributing the weight evenly and preventing sagging over time.
One of the most challenging aspects of hand-tying wefts is maintaining consistent tension across the entire row. If stitches are too loose, the weft may sag or shift; if too tight, it can pull uncomfortably on the scalp or create an unnatural-looking ridge. Skilled stylists develop an intuitive sense of the right tension, often described as “snug but not strained.” They work methodically across the row, checking their tension after every few stitches and making micro-adjustments as needed. This attention to detail ensures that when the row is complete, the weft lies perfectly flat and feels comfortable to the client.
True mastery in extension work lies not in the attachment itself but in making that attachment disappear. After all wefts are sewn in, the stylist’s focus shifts to creating a result that is completely undetectable. This begins with ensuring that no beads or threads are visible through the top layers of hair. The stylist carefully combs through the hair, parting it in various directions to check for any telltale signs of extensions. If any attachment points are visible, adjustments are made—sometimes by repositioning the client’s natural hair to provide better coverage, other times by making micro-adjustments to the placement itself.
Factory-made wefts often come with a blunt, straight-across edge that can look artificial when first installed. To remedy this, the stylist uses professional shears to customize the wefts to the client’s specific hair. This may involve point-cutting—making small, angled snips into the weft edge—to break up the straight line and create a softer, more natural transition. In some cases, especially when working with very fine natural hair, the stylist may also thin the wefts slightly by removing a few strands, ensuring the extensions don’t look obviously thicker than the client’s own hair.
Once the extensions are installed and customized, the client’s hair is thoroughly washed and conditioned. This serves multiple purposes: it removes any residue from the installation process, it allows the natural hair and extensions to “marry” together in their wet state, and it gives the stylist a clean canvas for styling. Special care is taken during washing to avoid rough manipulation of the attachment points. The hair is gently squeezed rather than rubbed, and conditioner is applied primarily to the mid-lengths and ends, keeping the roots and beads product-free to prevent slippage.
Blow-drying is where the natural hair and extensions truly begin to unite. Using a round brush, the stylist works methodically through the hair, directing airflow from roots to ends. The tension of the brush and the heat work together to smooth the cuticles of both the natural hair and the extensions, creating uniform shine and texture. As the hair dries, any slight differences in texture between the client’s hair and the extensions become less noticeable. The stylist pays particular attention to the areas where natural hair meets extensions, ensuring the transition is smooth and seamless.
The final styling step involves using heat tools to create a cohesive look. Whether the client prefers sleek straight hair or bouncy curls, the stylist ensures that both the natural hair and the extensions are styled identically. When curling, for example, the same-sized barrel and the same technique are used throughout, so the curls match perfectly from root to end. This uniformity is essential for creating a result that looks like one head of hair rather than natural hair with add-ons. The heat also helps set the style, ensuring it lasts until the client’s next wash.
Before presenting the finished result to the client, the stylist performs a comprehensive quality check. They view the hair from the front, sides, and back, using both natural and salon lighting to ensure no attachment points are visible. They run their hands through the hair, feeling for any bumps or irregularities. They ask the client to move her head, turn around, and even shake her hair out, observing how it moves and falls. Only when the stylist is confident that the extensions are truly undetectable do they hand the mirror to the client for the final reveal, knowing that the result will exceed expectations.
The first two days after installation are critical for allowing the extensions to settle properly. During this period, clients are advised to avoid washing their hair or getting the attachment points wet. This gives the beads and threads time to fully seat themselves, and allows the client to become accustomed to the new sensation of wearing extensions. Sleeping with hair in a loose ponytail or braid is recommended to prevent tangling, and clients should avoid applying any products near the roots. Following these initial guidelines sets the stage for long-term success with the extensions.
Proper brushing is essential for preventing tangles and maintaining the extensions’ appearance. Clients should use a loop brush specifically designed for extensions, or a soft-bristle brush that glides through hair without snagging. The correct technique involves holding the hair at the roots while brushing—this prevents tension on the attachment points and protects the scalp from pulling. Brushing should begin at the ends and work upward gradually, rather than dragging a brush from root to tip in one motion. Daily brushing, especially before bed, prevents small tangles from becoming major mats.
Washing hair with extensions requires a gentler approach than washing natural hair alone. Clients should focus shampoo on the scalp, using a diluted mixture if possible, and allow it to run through the lengths during rinsing rather than aggressively scrubbing the extensions themselves. Conditioner should be applied from the mid-lengths down, completely avoiding the beaded roots where product could cause slippage. All washing should be done with hair hanging downward—never piled on top of the head, which can cause tangling. After washing, hair should be gently squeezed with a microfiber towel rather than rubbed vigorously.
What happens at night significantly impacts how extensions wear over time. Clients should braid their hair loosely or pull it into a low ponytail before sleeping, preventing the extensions from rubbing against pillowcases and creating friction tangles. Silk or satin pillowcases are highly recommended, as they create less friction than cotton and help preserve both the extensions and the natural hair. Some clients also find that wearing a loose silk bonnet provides additional protection. These nighttime habits dramatically reduce tangling and extend the time between maintenance appointments.
Not all hair products are compatible with extension wear. Clients should avoid products containing alcohol, which can dry out both natural hair and extensions, and should steer clear of heavy oils or serums near the roots, where they can migrate to the beads and cause slippage. Sulfate-free shampoos and lightweight, water-based conditioners are ideal. When using heat styling products, clients should apply them to the mid-lengths and ends only, keeping the roots product-free. Professional extension brands often offer product lines specifically formulated for use with extensions, and these are generally safe choices.
Extensions are not a one-and-done service—they require ongoing maintenance to remain comfortable and attractive. As natural hair grows, typically about half an inch per month, the beaded tracks will gradually move away from the scalp. When this happens, the extensions no longer lie as flat, and the weight distribution changes. Most clients need maintenance appointments every 6 to 8 weeks, during which a stylist removes the wefts, moves the beads closer to the scalp, and resews everything in place. This regular care ensures that extensions remain comfortable, secure, and beautiful for months or even years of continuous wear.
The bead and sew method offers a secure, damage-free way to install weft extensions using silicone-lined micro beads and hand-tying techniques. The process begins with precise sectioning and beading to create a stable foundation, followed by carefully stitching the wefts for a natural fit. Proper blending through cutting and styling ensures the extensions are undetectable. For long-lasting results, daily brushing, gentle washing, and regular maintenance appointments every 6-8 weeks are essential to keep the hair comfortable, secure, and beautiful. This comprehensive approach transforms natural hair with volume and length while preserving its health.
Dont hesitate to Contact EMEDA Hair Factory:
 WhatsApp: +8618562611116
Email: sales02@emedahair.com